If you’re looking for a tutorial on How to Make a Private Discord Server, then keep reading as today I’m going to give you a complete step-by-step method to create a Private Discord channel or server on Discord.
In today’s world, Discord has become one of the most popular chatting platforms for gamers. Every famous twitch or youtube streamer has their own Discord community servers where we can join to connect with more like-minded gamers like us.
If you also want to start your own Discord server but for private group members only. You have to learn how to make a Discord server invite only. If you don’t know how to do it, today you’re going to learn it here.
Contents
How to Make a Private Discord Server?
Before we go through the process of creating a private Discord channel/server, let’s understand what does a Private Discord Server means & what’s the difference between a Public vs a Private Discord Server.
Public vs Private Discord Server
A Public Discord server is a regular Discord public community where anyone can join, chat, send, view, & receive messages. It’s a Discord channel where all users can connect. Now, let’s understand what a Private Discord server is.
Basically, a Private Discord server is a special channel on your server where only private members can send or read messages. You can completely customize the permissions regarding who can read or send messages & a lot more.
That means, not everyone on that server can access that private channel normally. Only the users’ admin allows inside that channel can use and access that private channel on the Discord server.
So if you have a few close friends who are also managing your Discord server, you can create a private channel where you guys can arrange private meetings on your server with all of your important users.
Now that you know the difference between a Public vs Private Discord server, let’s see how to make a Discord Server Private. Make sure to follow each step carefully.
How to Make a Discord Server Private?
So to make a Discord server private, the first thing you must have is a regular public Discord server. The trick is to create a public Discord server first, then we’ll create a new channel in that server and make it private by customizing the permissions of that channel.
If this sounds a bit technical to you, don’t worry, just keep following the steps below to create your new Discord server, and then you’ll learn how to make it private & invite-only.
Steps to Create a Discord Server
You can follow the steps on both mobile and a computer as well. Let’s begin by creating a server first.
1. Open Discord app on mobile or computer.
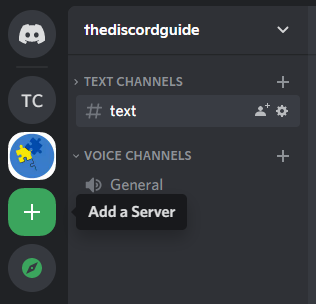
2. Click on the Plus icon to create a new Discord server.
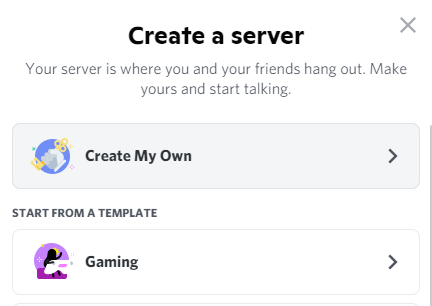
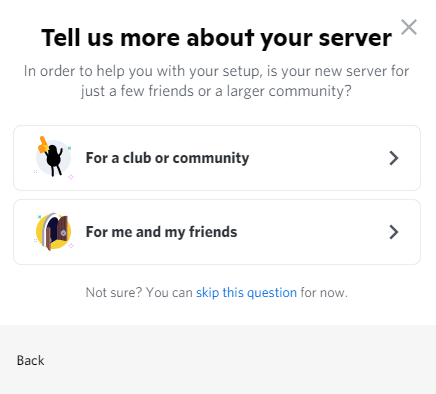
3. Click “Create My Own” and give your server a name.
4. Upload a logo/icon for your server if you want to.
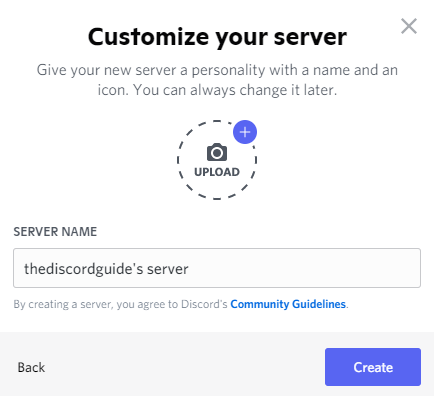
5. Simply, click on the “Create” button to make your server live.
Once you have created a new server, now you can make it private by customizing the roles & permissions of the users on this server. Firstly, as it is a new server, add all of your friends by sending them an invite link to your server.
Once you have all your important users on the server, now you can make it private and customize all the roles & permissions for your users. Now let’s see how to make a server private on discord
Steps to Create a Private Discord Channel
Now that you have a Discord server created with your friends in it. Simply follow the below step-by-step tutorial to make your server private, just for your friends. Again, feel free to follow the guide on PC or mobile.
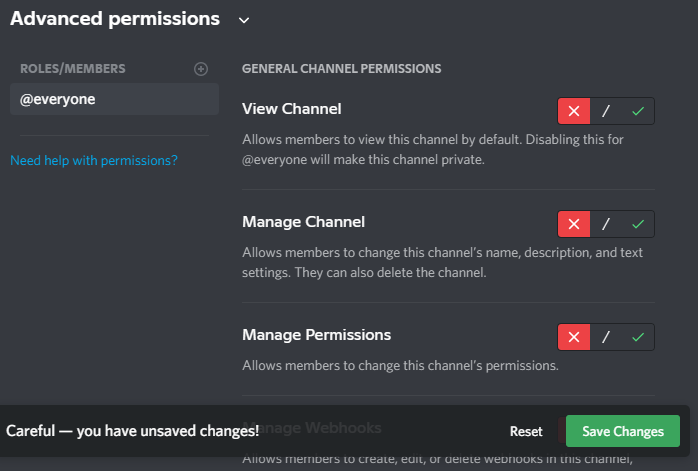
1. Go into your Discord server & click on the gear icon of the text channel.

2. Click on the “Permissions” settings and choose the role as @everyone.
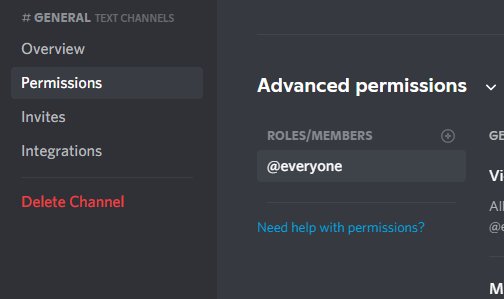
3. For @everyone as role, choose the red ‘X’ icon for every setting & save the settings.
4. Now add another role by clicking the “+” icon near roles.
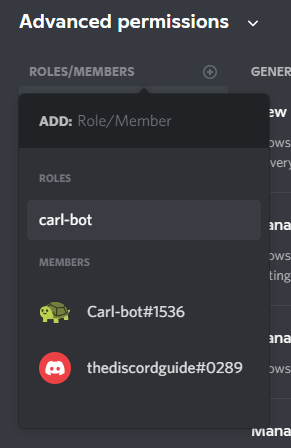
5. Simply add your desired private group members & allow their permissions in the private server.
Make sure to add all the users which you want in your private server as the role and set their permissions of what they are allowed to do in the server accordingly.
If you do not know what permissions to allow, mostly you should hit the green checkmarks for “Read Text Channels” & “Send Messages”. Also, you can allow your members in the “Voice Channels” as well. Just repeat the steps until you have added all the members & hit the save changes button.
How to Make a Discord Server Invite Only?
So now you know how to make a discord server private, but what if you only want your friends to join the server, no one else. In that case, you must know how to make a discord server invite only.
Basically, all you need to do is that you just have to set an expiration date for the invite link while you are sending the invite link to your friends. Once all your friends are joined, then the link gets expired and no one else using that link can join your server.
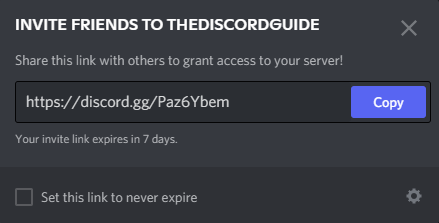
To do this, just go to your private server click on the drop-down near your server name, and click on “Invite People”. Here you can customize the behavior of your Invite Links.
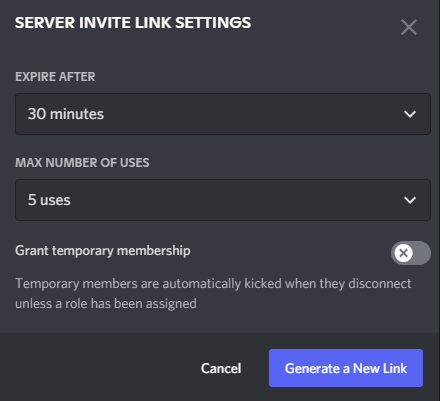
In case “Set this link to never expire” is checked on, simply uncheck it. Also, to create an invite link just for your members, click on the gear icon and choose to Expire After 30 Minutes so the link only remains valid for half an hour.
Also, in the Max, no of uses, set the limit as the number of people you want to add so no one else can join your server after the limit.
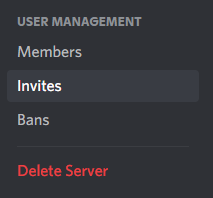
In case, you already have created several invite links that have no expiration. Then you can revoke those links so they stop working. Just go into the “Server Settings” and under User Management, choose “Invites”.
Here you can revoke or delete all the working invite links that are driving users to your Discord server. In case there are unnecessary users in your server already, go in the “Members” section, and here you can kick out users that you do not want on your server.
Conclusion
Yes, creating a private discord server, adding all the members one by one manually, and setting their permissions takes a bit of time. But it’s just a one-time process, right?
Once you set up your private server with all the members, then you can anytime use your server, and it’s not a bit more of a hassle later. In case, you need to add more members later, simply repeat the same steps.
Just make sure you invite your members to the server first, only then you will see the option to set their permissions on the selected server.
I hope now you have learned how to make a private discord server and customize your own private server on Discord. I wish you build a great community on your newly launched server.
Also, do check out this awesome tutorial on how to ping someone on discord. If you want to read more awesome Discord Tutorials, do turn on our notifications and newsletters to never miss an update from The Discord Guide!
Hey Folks, I am Dustin Anderson. I’m a very passionate tech enthusiast who loves experimenting with cool gadgets and software on the computer. On this blog, I majorly write informative & in-depth Discord Tips, Tricks & Tutorial Guides.